dartboard setup at home
Setting up a dartboard at home may seem simple at first, but doing it correctly makes a huge difference—especially for beginners. A proper home dartboard setup helps improve accuracy, build good habits, and make practice more enjoyable. On the other hand, a poor setup can lead to frustration, inconsistent throws, and even damage to your walls or floor.
When we first set up a dartboard at home, we made a few small mistakes that didn’t seem important at the time. The board was slightly too high, the lighting wasn’t great, and we didn’t protect the wall properly. Once we fixed these issues, practice immediately felt more comfortable and consistent.
This guide explains how to set up a dartboard at home step by step, covering height, distance, lighting, safety, and common mistakes beginners should avoid.For more dartboard height and distance guide details.
🧠 Why Proper Dartboard Setup at Home Matters
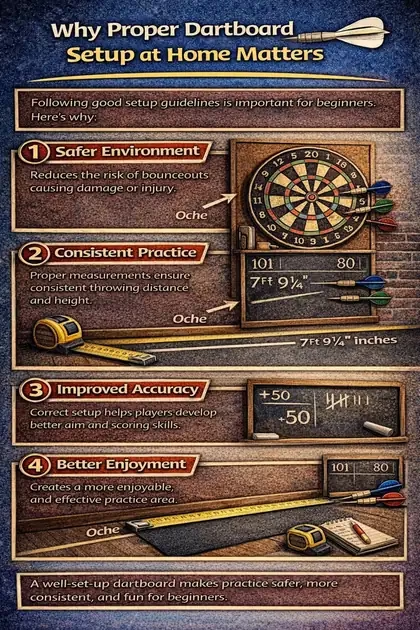
Darts is a game of repetition and muscle memory. Your body learns from the environment you practice in. If your dartboard setup is wrong, your body learns incorrect habits.
A proper home setup helps beginners:
Develop consistent throwing technique
Improve accuracy faster
Avoid arm or shoulder strain
Practice safely and confidently
Correct setup is one of the easiest ways to improve without changing your technique.
🏠 Choosing the Right Location at Home
Before mounting your dartboard, choose the right spot.
What to Look For
Enough space to stand comfortably
Clear throwing lane
Solid wall for mounting
Minimal foot traffic
- Details of mount a dartboard on drywall
Basements, garages, spare rooms, and game rooms work well.
What to Avoid
Narrow hallways
Areas near fragile objects
High-traffic living spaces
A calm, open area improves focus and safety.
📏 Dartboard Height at Home (Beginner Standard)
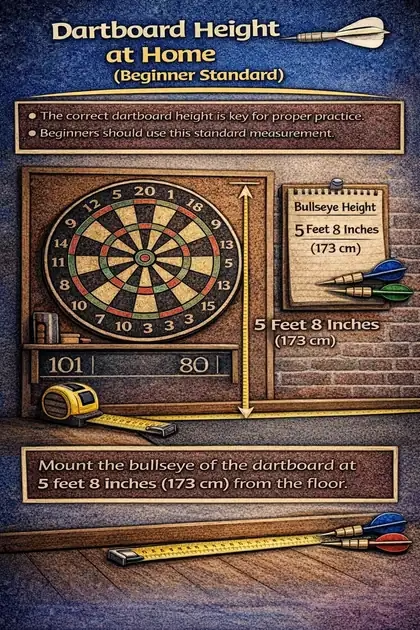
Regulation Dartboard Height
The official dartboard height is:
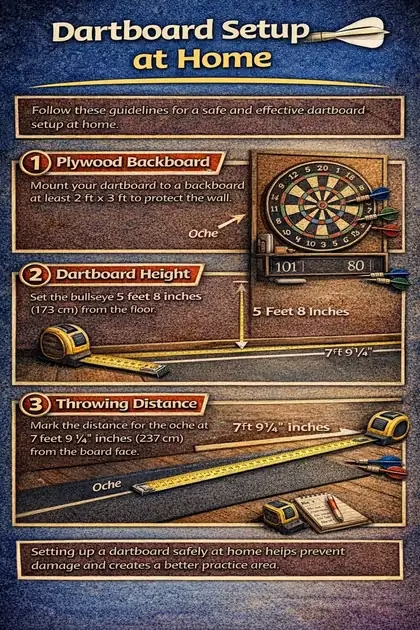
5 feet 8 inches (173 cm) to the center of the bullseye, as regulated by the World Darts Federation standards.
This height applies to:
Steel-tip dartboards
Electronic dartboards
Home and competitive play
Using regulation height from the start helps beginners build correct muscle memory.
📐 Dartboard Distance at Home
Height alone isn’t enough. Distance matters just as much.
Standard Throwing Distance
7 feet 9¼ inches (2.37 meters)
Measured from the front face of the dartboard to the throwing line. You can verify these professional setup requirements on the PDC Official Website.The perfect dartboard distance and height details are here.
Always measure carefully. Even small distance errors can affect accuracy.
🛠️ How to Mount a Dartboard at Home (Step-by-Step)
Step 1: Measure the Height
Use a tape measure to mark 5 feet 8 inches from the floor.
Step 2: Mark the Bullseye Point
Make a small pencil mark where the bullseye center will be.
Step 3: Install the Wall Mount
Use the mounting bracket or center screw provided with your dartboard.
Step 4: Hang the Dartboard
Align the bullseye with your height mark.
Step 5: Check Stability
The board should not wobble when touched.
Also dartboard maintenance tips are here
Taking time here prevents future problems.
Most high-quality boards use a standard U-bracket. For a visual guide on heavy-duty mounting, check out the installation tips from Winmau Darts.
💡 Lighting Your Dartboard Properly
Lighting is often overlooked but extremely important.
Good Lighting Tips
Use focused lighting on the board
Avoid shadows on the bullseye
Do not rely only on ceiling lights
Poor lighting causes eye strain and missed throws, even with good technique.
🧱 Protecting Your Wall and Floor
Beginners miss the board frequently—and that’s normal.
Wall Protection Options
Dartboard surround
Foam or cork backing
Protective wall panels
Floor Protection
Dart mat
Carpet or rubber mat
Protecting your space allows stress-free practice.
🧍 Creating a Safe Throwing Area
Safety should always come first.
Safety Tips for Home Setup
Keep people and pets away while throwing
Never throw darts casually
Store darts safely after use
Make sure the area behind the thrower is clear
Good habits prevent accidents.
🧠 Steel-Tip vs Electronic Dartboard Setup
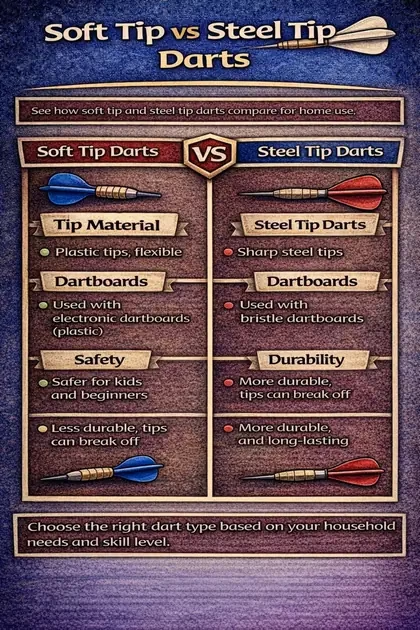
Steel-Tip Dartboards
Require solid wall mounting
Need more wall protection
Produce more bounce-outs
Electronic Dartboards
Often lighter
Safer for families
Require power or batteries
Both types use the same height and distance for adult beginners.
👶 Dartboard Setup for Kids at Home
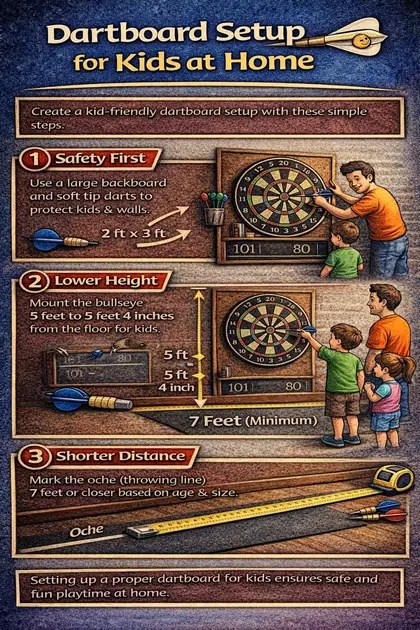
For children:
Lower the board slightly if needed
Use soft-tip darts
Supervise play at all times
As kids improve, gradually transition to regulation height.
❌ Common Dartboard Setup Mistakes Beginners Make
Mounting the Board Too High or Low
This affects throwing angle and accuracy.
Incorrect Distance Measurement
Always measure from the board face, not the wall.
Poor Lighting
Shadows make aiming difficult.
No Wall Protection
Leads to damage and stress during practice.
Avoiding these mistakes improves learning speed.
🧠 How Proper Setup Improves Practice
A correct home setup:
Encourages consistent throwing motion
Builds confidence
Reduces frustration
Makes practice more enjoyable
From our experience, beginners who fix setup issues early improve much faster.
🕒 How Often Should You Check Your Setup?
Recheck your setup:
After moving the board
After wall adjustments
Every few months
Walls and mounts can shift over time.
🧠 Mental Comfort and Home Practice
A clean, well-lit, safe setup helps you relax. Relaxation leads to smoother throws and better accuracy.
Comfort matters more than most beginners realize.
❓ Frequently Asked Questions
Can I set up a dartboard in an apartment?
Yes, with proper wall and noise protection.
Does dartboard height change for home use?
No, regulation height is recommended.
Is a dartboard stand a good option?
Yes, if wall mounting isn’t possible.
How much space do I need?
At least 10 feet of clear throwing space.
Is setup different for beginners?
No—beginners benefit most from correct setup.
🧠 Final Thoughts
Setting up a dartboard at home correctly is one of the best things a beginner can do. It costs little time but delivers long-term benefits in accuracy, comfort, and confidence.
From what we’ve seen, beginners who take setup seriously enjoy practice more and improve faster. A proper dartboard setup at home creates the foundation for everything else—technique, practice routines, and enjoyment of the game.
Take your time, measure carefully, and build a setup you’re comfortable practicing with every day.
🔒 Transparency Notice
This article is for informational purposes only. Results may vary depending on individual setup conditions and practice habits.